Follow Me On Social Media!
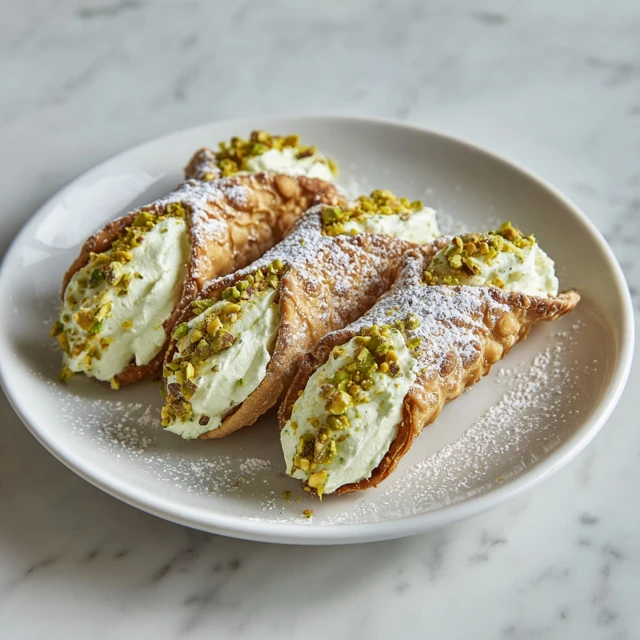
Pistachio Cannoli with Creamy Mascarpone Filling – A Classic Italian Dessert with a Nutty Twist
Pistachio Cannoli with Creamy Mascarpone Filling brings together crisp pastry shells and a rich, velvety filling for a truly indulgent dessert experience. This Italian cannoli recipe blends smooth mascarpone, lightly sweetened ricotta, and finely chopped pistachios to create a luxurious filling that is both creamy and slightly nutty.
Cannoli are one of the most iconic desserts in Italian pastry tradition. With their crunchy exterior and soft, sweet center, they offer the perfect contrast in texture. This pistachio variation adds depth of flavor and an elegant green hue, making it ideal for special occasions, holidays, or dinner parties.
If you are looking for a homemade cannoli dessert that tastes authentic yet feels elevated, this pistachio cannoli recipe is the perfect choice.

The Story Behind Cannoli
Cannoli originated in Sicily and have become a symbol of Italian pastry craftsmanship. Traditionally filled with sweetened ricotta cheese, modern variations now include chocolate, citrus, and nut-based fillings.
Pistachios are especially popular in Sicilian desserts due to the region’s abundant pistachio production. Incorporating pistachios into mascarpone cannoli filling enhances both texture and flavor while maintaining the dessert’s traditional charm.
Why You’ll Love This Pistachio Cannoli Recipe
- Crispy shells with creamy mascarpone filling
- Elegant dessert perfect for entertaining
- Balanced sweetness with nutty pistachio flavor
- Easy to assemble with store-bought or homemade shells
- Medium difficulty with bakery-quality results
These pistachio cannoli look impressive but are surprisingly manageable at home.
Ingredients
Cannoli Filling
- 1 cup whole milk ricotta cheese (drained well)
- 1 cup mascarpone cheese
- ¾ cup powdered sugar
- ½ cup finely chopped pistachios
- 1 tsp vanilla extract
- ½ tsp orange zest (optional)
- ¼ cup mini dark chocolate chips (optional)
Assembly
- 12 cannoli shells
- ¼ cup crushed pistachios (for garnish)
- Powdered sugar (for dusting)

Instructions
- Drain the Ricotta
Place ricotta cheese in a fine mesh strainer lined with cheesecloth and let drain for at least 1 hour to remove excess moisture. This ensures a thick filling. - Prepare the Filling
In a large mixing bowl, combine drained ricotta and mascarpone cheese. Beat gently until smooth and creamy. - Add Sweetness and Flavor
Mix in powdered sugar, vanilla extract, and orange zest. Fold in chopped pistachios and mini chocolate chips if using. - Chill the Filling
Refrigerate the filling for at least 30 minutes to firm up and enhance flavor. - Fill the Cannoli
Transfer filling to a piping bag fitted with a large round tip. Pipe filling into each cannoli shell from both ends toward the center. - Garnish
Dip the ends of each filled cannoli into crushed pistachios. Lightly dust with powdered sugar before serving. - Serve Immediately
For best texture, serve shortly after filling to maintain shell crispness.
Tips for Perfect Cannoli
Drain Cheese Thoroughly
Excess moisture causes runny filling. Proper draining ensures thick consistency.
Fill Just Before Serving
Filling too early can soften the shells. Assemble close to serving time for maximum crunch.
Enhance Pistachio Flavor
Lightly toast pistachios before chopping to intensify their nutty aroma.
Use Quality Mascarpone
High-quality mascarpone delivers richer texture and flavor.

Variations
- Chocolate Pistachio Cannoli: Add melted dark chocolate drizzle over the top.
- Lemon Pistachio: Increase citrus zest for a brighter flavor.
- Almond Version: Substitute pistachios with toasted almonds.
- Espresso Twist: Add ½ teaspoon espresso powder for depth.
Serving Suggestions
Pistachio cannoli pair beautifully with:
- Espresso or cappuccino
- After-dinner coffee
- Dessert wine
- Holiday dessert platters
Arrange on a white serving tray and sprinkle extra pistachios for an elegant presentation.
Storage Tips
- Store unfilled shells in airtight container at room temperature.
- Refrigerate filling separately up to 3 days.
- Assemble just before serving for best results.
Frequently Asked Questions
Can I make cannoli shells at home?
Yes, but store-bought shells save time and work well for most home bakers.
Can I freeze cannoli?
Unfilled shells freeze well. Filled cannoli are best enjoyed fresh.
Can I use only mascarpone?
Yes, but combining ricotta and mascarpone creates balanced texture and sweetness.
Final Thoughts
Pistachio Cannoli with Creamy Mascarpone Filling is a refined yet approachable classic Italian dessert. The crisp shell, velvety filling, and nutty pistachio garnish create a harmonious blend of textures and flavors.
Perfect for celebrations, dinner parties, or indulgent weekend baking, this pistachio cannoli recipe delivers authentic taste with a modern twist.
Pistachio Cannoli with Creamy Mascarpone Filling
Crispy cannoli shells filled with sweet mascarpone and ricotta cream blended with pistachios.
Ingredients
Equipment
Method
- Drain ricotta cheese for at least 1 hour.
- Beat ricotta and mascarpone until smooth.
- Mix in powdered sugar, vanilla, zest, and pistachios.
- Chill filling for 30 minutes.
- Pipe filling into cannoli shells.
- Dip ends in crushed pistachios and dust with powdered sugar before serving.
Notes
Fill shells just before serving to maintain crisp texture.