Follow Me On Social Media!
No-Bake Kinder Chocolate Bars – The Ultimate Easy Layered Dessert
If you’re looking for a dessert that’s rich, creamy, and incredibly easy to make, No-Bake Kinder Chocolate Bars are the perfect choice. These indulgent bars feature layers of chocolate, a smooth creamy filling, and a crunchy biscuit base—all without turning on the oven.
Perfect for beginners and experienced bakers alike, this recipe delivers a bakery-style dessert with minimal effort. Whether you’re preparing a treat for guests, family, or just yourself, these bars are guaranteed to impress.

Why These No-Bake Bars Are So Popular
No-bake desserts have taken over modern kitchens for good reason, and this kinder dessert recipe is no exception:
- No oven required: Ideal for quick preparation
- Layered texture: Crunchy, creamy, and smooth
- Rich chocolate flavor: Perfect for chocolate lovers
- Easy to customize: Add your favorite ingredients
- Make-ahead friendly: Great for parties and events
These qualities make it one of the best no bake chocolate bars you can prepare at home.
Ingredients
For the Base
- 2 cups crushed biscuits
- ½ cup melted butter
For the Cream Layer
- 1 cup sweetened condensed milk
- ½ cup heavy cream
- 1 cup milk chocolate (melted)
For the Top Layer
- 1½ cups milk chocolate (melted)
- 2 tbsp butter (for smooth texture)

Instructions
Step 1: Prepare the Base
In a bowl, mix crushed biscuits with melted butter until well combined.
Press the mixture firmly into a lined baking dish to form an even base. Refrigerate for 15–20 minutes.
Step 2: Make the Cream Layer
In a saucepan over low heat, combine condensed milk, cream, and melted chocolate. Stir until smooth and thick.
Pour the mixture over the chilled base and spread evenly. Refrigerate again for 20–30 minutes.
Step 3: Add the Chocolate Top
Melt chocolate with butter until smooth and glossy.
Pour over the cream layer and spread evenly.
Step 4: Chill
Refrigerate for at least 2 hours or until fully set.
Step 5: Slice and Serve
Cut into bars or squares and serve chilled.
Tips for Perfect No-Bake Bars
Press the base firmly:
Ensures the bars hold their shape when sliced.
Use good-quality chocolate:
Improves flavor and texture significantly.
Chill properly:
Allow enough time for layers to set.
Cut with a warm knife:
Gives clean, sharp edges.

Flavor Variations
1. Nutty Version
Add crushed hazelnuts or almonds to the base.
2. White Chocolate Layer
Replace part of the chocolate with white chocolate.
3. Oreo Twist
Use crushed Oreos instead of plain biscuits.
4. Caramel Addition
Add a thin caramel layer between the base and cream.
Serving Suggestions
These chocolate biscuit bars are perfect for:
- Dessert platters
- Holiday treats
- Afternoon snacks
- Party desserts
Serve chilled with coffee or milk for the best experience.
Storage and Shelf Life
Storage:
Keep in the refrigerator in an airtight container for up to 5 days.
Freezing:
Freeze for up to 2 months and thaw before serving.
Nutritional Notes
To make this dessert lighter:
- Use dark chocolate instead of milk chocolate
- Reduce butter slightly
- Use low-fat cream alternatives
Fun Fact
Kinder chocolate is known for its creamy milk filling and smooth texture, which inspired many homemade dessert variations like these no-bake bars.
Why You’ll Love This Recipe
No-Bake Kinder Chocolate Bars are simple, rich, and incredibly satisfying. With no baking required and easy-to-find ingredients, they’re perfect for anyone looking to create a delicious dessert with minimal effort.
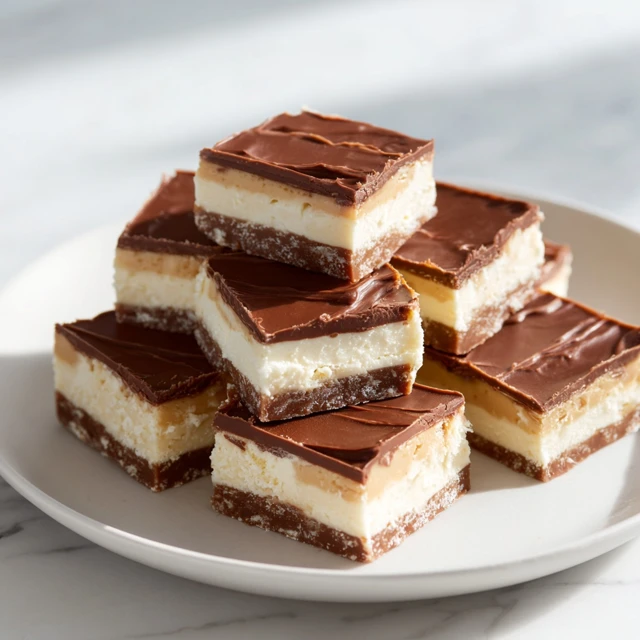
No-Bake Kinder Chocolate Bars
Layered chocolate bars with a creamy center and biscuit base, no baking required.
Ingredients
Equipment
Method
- Mix biscuits and butter, press into pan.
- Add cream chocolate layer and chill.
- Pour melted chocolate on top.
- Chill until set and slice.
Notes
Chill well before cutting.